Keeping a garage dry starts with one simple goal: stop water at the door. If you have wondered how to prevent water from entering under garage door gaps, you are far from alone—especially across the GTA where spring thaw, slushy snow, and summer downpours hit hard. A small gap under the door can act like a tiny creek, carrying water straight into your garage.
Water inside a garage does more than wet the floor. It can lead to mould, rusted tools, swollen drywall, and even foundation damage. Add ruined storage and a musty smell, and the cost adds up quickly. The good news is that there are proven ways to block and divert that water before it reaches your belongings.
Swift Garage Doors has helped Toronto-area homeowners and property managers keep garages dry for over a decade. This guide walks through five proven approaches—from replacing a garage door bottom seal to adding a garage door threshold seal and improving drainage. Most fixes are simple; others call for a pro. Start by finding the cause, then pick the right mix for lasting results.
Key Takeaways
Before diving in, here is a quick preview of what you will learn and how it helps you keep a dry, clean floor.
- Replacing a worn garage door bottom seal is the fastest, most budget-friendly fix. It restores the first barrier against rain, slush, and pests and often solves light seepage on its own.
- Adding a garage door threshold seal creates a raised floor dam. It pairs with the bottom seal to block flowing water and bridge small floor imperfections for tighter contact.
- Upgrading side and top garage door weather stripping stops wind-driven rain. A full perimeter seal reduces drafts, dust, and noise while improving comfort in attached garages.
- Improving driveway slope and adding channel or French drains manages water outside. Stopping water before it reaches the door keeps the interior dry even in heavy storms.
- Professional assessment by Swift Garage Doors finds all the causes at once. You get the right fix the first time, backed by expert installation, quality materials, and 24/7 help when needed.
Understanding Why Water Enters Under Your Garage Door

Stopping water starts with a clear diagnosis. Water can sneak in under the door because of a worn garage door bottom seal, a gap in concrete, a driveway that pushes water toward the house, or a mix of these. Picking the right garage floor water barrier or drainage option is easier once you know the “why.”
Begin with a simple inspection. Close the door and check for daylight along the bottom and sides. If you see light, water can follow the same path. Look at the rubber seal for cracks or flattening. Then check the driveway slope with a long level to see if it slopes away from the door. A slight pitch is enough to move water out to the street.
If the issue is more than a small gap, a pro can save time and money. Swift Garage Doors checks seals, door alignment, opener settings, slab condition, and nearby drainage in one visit. That way you get a clear plan instead of trying several fixes in the dark.
“Water follows the path of least resistance—give it a better path than your garage.” — Field proverb among drainage contractors
Common Causes of Garage Water Intrusion
A few trouble spots cause most water problems, and several can stack up at once.
- Worn or damaged bottom seals let water pass. UV exposure, freeze–thaw cycles, and daily use flatten or crack rubber, so it no longer presses tightly to the floor.
- Improper driveway grading pushes water toward the door. A negative slope turns the driveway into a channel aimed at the garage, which overwhelms even a good seal.
- Settled or cracked concrete creates low spots under the door. Water pools in these depressions and finds the smallest opening to seep inside.
- Inadequate drainage leaves water with nowhere to go. Without a channel drain or French drain, heavy rain or snowmelt collects at the entrance and works under the seal.
- Missing or damaged threshold seals remove a key line of defence. A raised threshold blocks flowing water and helps the bottom seal make solid contact.
- GTA climate adds pressure with rapid freeze–thaw, heavy spring rain, and slush from road salt. All of that accelerates wear and widens gaps.
How to Diagnose Your Water Intrusion Problem
- Start with the daylight test. Close the door, turn off the lights, and check for visible light under or around the door. Any light shows a potential water entry point.
- Use the water test next. From outside, gently spray a garden hose at the base of the closed door for a few minutes. Watch inside to see where water first appears. Keep the pressure low to mimic rain, not a pressure washer.
- Inspect the floor for cracks and low spots along the door line. Look for pitting, spalling, and the joint between the driveway and slab.
- Check the slope with a long level or straight board. The grade should fall away from the garage by about 1/4 inch per foot.
- Call Swift Garage Doors if you see multiple gaps, the door looks misaligned, or water arrives even with a new seal. A pro will spot issues with tracks, springs, opener settings, and the slab that are easy to miss.
Solution #1: Swift Garage Doors – Professional Assessment and Custom Plans
A professional assessment is the fastest path to a dry garage when the cause is not obvious or when several issues overlap. Instead of guessing, you get a clear plan that covers seals, thresholds, alignment, and drainage contacts where needed. The result is long-term performance without repeated callbacks or rework.
Swift Garage Doors stands out in the GTA with licensed technicians, 24/7 emergency support, and more than a decade of hands-on experience. We match the right garage door water seal, garage door threshold seal, and perimeter weather stripping to your door and Toronto’s tough winters. After installation, we test with a water run and daylight check so you can see the difference on the spot.
Our customer-first approach means quality parts suited for Canadian cold, careful workmanship, and clear communication. If drainage or concrete repair is part of the plan, we coordinate timing and recommend trusted partners so everything lines up.
“What looks like a bad seal is often a low spot, misaligned track, or an opener set to stop too early.” — Swift Garage Doors Service Team
Why Choose Professional Installation Over DIY
- A pro diagnoses the full picture. What looks like a bad seal might also be a low spot or a mis-set opener that stops too early.
- Product selection matters. Matching the bottom seal profile to the retainer and choosing EPDM rubber over vinyl in cold climates pays off over many seasons.
- You get parts-and-labour protection and faster results. Missteps with DIY can add trips to the store, wasted materials, and ongoing leaks.
- Safety is a real factor. Springs, heavy doors, and opener settings can cause injury if handled the wrong way.
Swift Garage Doors’ Comprehensive Water Prevention Service
We start with a multi-point inspection: bottom seal, garage door weather stripping on the sides and top, door balance, track alignment, floor condition, driveway slope, and nearby gutters or downspouts.
You receive a custom plan that can include a garage door bottom seal upgrade, a garage door threshold seal, perimeter stop moulding, and opener setting adjustments. We use premium materials built for freeze–thaw cycles and road salt.
Our team installs with care, then performs a daylight and hose test. After that, we set a maintenance schedule and share simple upkeep tips, so the protection lasts.
Emergency Services for Sudden Water Intrusion
When heavy rain or rapid melt hits, water can arrive fast. Our team offers 24/7 emergency service across the GTA with same-day response in most cases. We can place temporary barriers, adjust door settings, and schedule permanent work once the weather clears. Call our emergency line or book online for the fastest help.
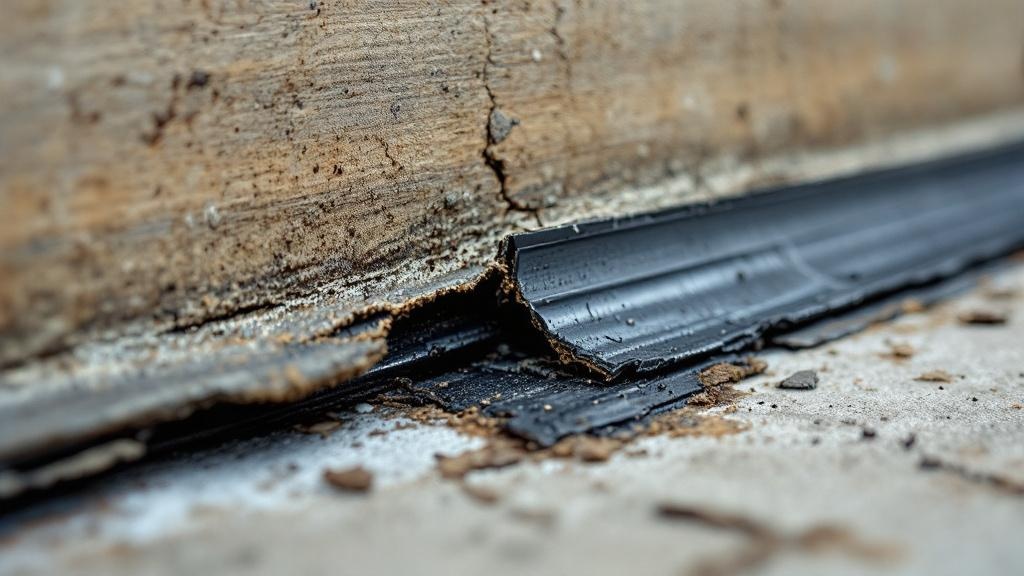
Solution #2: Replace Your Garage Door Bottom Seal

The garage door bottom seal is the first and most important defence against water and drafts. If it is worn, cracked, or flattened, even a light rain can creep inside. Replacing it restores a tight contact point across the floor and often fixes minor seepage immediately.
Modern seals come in several profiles that slide into an existing retainer under the door. EPDM rubber is the top pick for GTA winters because it stays flexible in the cold. Vinyl is more budget-friendly but can harden and crack sooner. EPDM stands for ethylene propylene diene monomer.
Installing the correct profile and width matters. A bulb-style seal can bridge small dips in the floor, while a T-channel or bead-end profile must match the retainer so it seats properly and stays put.
Identifying a Worn-Out Bottom Seal
- Look for cracks, splits, and hard, shiny spots that no longer cushion the door. A flattened shape or chunks missing at the corners point to replacement time.
- If you see daylight under the door or water trails after rain, the seal is not doing its job. In the GTA, vinyl seals often last 5 to 7 years, while EPDM can run 10 to 15 with simple care.
- Cold snaps can expose failing seals. If the leak appears mainly in winter, the material may be stiff and no longer sealing to the floor.
Types of Garage Door Bottom Seals
- T-channel seals are common and slide into two parallel grooves on the retainer. They are reliable and easy to replace when matched correctly.
- U-channel or wrap-around styles secure with fasteners and can add coverage when a retainer is missing or damaged.
- Bead-end seals fit C-shaped channels on certain doors. They lock in tightly when the bead matches the track.
- Bulb seals, often called P-bulbs, compress well on uneven floors. The rounded shape fills dips and helps seal low spots.
- Materials matter. EPDM rubber costs more than vinyl but stays flexible in the cold and resists cracking. Some premium seals include pest-resistant fibres to help block rodents at the base.
Professional Bottom Seal Replacement Process
A pro measures the door width, confirms the retainer profile, and inspects for bent or corroded tracks. If the retainer is damaged, it is repaired or replaced so the new seal slides freely.
The old seal is removed, and the retainer is cleaned. A silicone-compatible lubricant helps the new seal glide into place without stretching or kinking.
After installation, the door is checked for balance and proper close pressure. The opener close-limit is dialled so the seal compresses evenly. Swift Garage Doors finishes with a water and daylight test and shares care tips. For most doors, this is a quick, cost-effective visit.
Solution #3: Install a Garage Door Threshold Seal

A garage door threshold seal adds a raised rubber strip to the floor, creating a mini-dam that stops flowing water. Paired with a fresh bottom seal, it forms a double barrier that blocks rain, slush, dust, and pests. It is a go-to option for uneven floors and driveways that send water toward the door.
Because the threshold bonds to concrete, surface prep and placement are vital. When installed correctly, a quality EPDM threshold can last well over a decade, even with car traffic and winter salt.
Thresholds are available in different heights, most commonly 1/2 to 1 inch. Pick a height that bridges the largest gap without creating a frustrating bump.
How Threshold Seals Create a Water Barrier
Think of the threshold as a speed bump for water. It raises the inside edge of the entry, so flowing water meets a wall instead of a clear path to the garage.
When the door closes, the bottom seal compresses onto the raised hump for a tight seal. The sloped outside edge helps divert water back toward the driveway.
Thresholds also bridge small dips in the concrete where a flat seal struggles to make contact. The combined height and compression stop water that would otherwise slip under the lowest point.
“Thresholds don’t stop standing water; they stop moving water.” — Common installer tip
When a Threshold Seal Is Your Best Option
- Choose a threshold when the slab is uneven or settled along the door line. It also shines when the driveway has a slight negative slope toward the garage.
- Use it as a second layer if a new bottom seal still leaves minor leaks. It is especially helpful during heavy rain and rapid snowmelt common across the GTA.
- For homes with large water flow, combine a threshold with exterior drainage like a channel drain for a complete defence.
Professional Threshold Installation Requirements
- Clean concrete is everything. Grinding or wire-brushing the surface, degreasing, and vacuuming dust help the adhesive bond permanently. Skipping this step is the quickest path to failure.
- Placement matters. The highest point of the threshold should sit just inside the closed door line so the bottom seal lands squarely on the hump.
- Use a commercial-grade adhesive rated for concrete and cold weather. Apply in a zigzag pattern within the marked lines to avoid squeeze-out, then close the door to weight the strip while it cures.
- Plan for curing time. Avoid driving over the threshold for 24 to 48 hours, and check that your door clears the height with room to spare. In the GTA, spring through fall offers the best temperatures for bonding.
Common DIY mistakes include poor surface prep, off-centre placement, and using a weak adhesive. Swift Garage Doors handles prep, placement, bonding, and testing so you get a long-lasting barrier.
Solution #4: Improve Drainage Around Your Garage

Stopping water at the source is often the most reliable long-term fix. Good grading and drainage move water away before it reaches the door. This can be as simple as downspout extensions or as involved as a channel drain across the driveway.
A garage door water guard works better when the driveway pitches away. If the slope is wrong or volume is high, an exterior drain intercepts the flow. Swift Garage Doors can evaluate the door and connect you with trusted drainage pros when the property needs more than sealing.
Grading and Slope Correction
Driveways should fall away from the garage by about 1/4 inch per foot. Use a level or straight edge to check your slope. If the bubble points toward the door, water will do the same.
Minor slope issues may be addressed with overlays or resurfacing. Severe negative slope often calls for a full driveway redo to reset the grade.
Around the foundation, the yard should also pitch away. A simple regrade near the wall can reduce pooling against the slab. For bigger projects, consult experienced paving or grading contractors.
“Aim for at least a 2% slope (roughly 1/4 inch per foot) away from the door to direct water off the slab.” — Common building practice
Installing Channel Drains and French Drains
A channel drain sits across the driveway in front of the garage and catches surface water before it reaches the door. Under the grate, a trench directs water to a storm drain, dry well, or safe discharge point.
French drains work below the surface. A perforated pipe surrounded by gravel collects groundwater around the garage and moves it away from the foundation.
Channel drains excel with surface runoff from a sloped driveway. French drains help when soil stays saturated or water pushes through cracks. Both require proper slopes, cleanouts, and professional installation.
Gutter and Downspout Management
Overflowing gutters dump roof water onto the driveway. Clean eavestroughs in spring and fall, and check that water moves freely to the downspouts.
Extend downspouts 6 to 10 feet away from the garage and point them downslope if possible. Add splash blocks or underground extensions to reduce erosion and keep water from circling back.
A quick monthly check after storms can reveal clogs early, before they send a sheet of water to your door.
Solution #5: Repair Concrete Cracks and Foundation Issues
If the concrete under your door is cracked, pitted, or settled, even the best seal will struggle. Fixing the slab or patching low spots restores a flat landing for the bottom seal and improves contact across the full width.
Concrete repairs range from simple crack sealing to lifting sections that have sunk. Choose the method based on damage severity, budget, and how quickly you need the garage back in service.
Identifying Problematic Concrete Damage
Hairline cracks may not leak on their own, but wider cracks and spalling can collect water and wick it inside. Low spots along the door line show up as puddles after rain.
Watch the joint where the driveway meets the slab. Gaps here allow water to pool against the door. Signs of foundation movement, like step cracks or doors that go out of square, call for a pro assessment.
Concrete Repair Options
Use flexible polyurethane or epoxy injection for small to medium cracks to keep water out. For minor depressions and crumbling edges, self-levelling compounds can create a smoother landing for the seal.
For sunken slabs, mudjacking lifts concrete by pumping a grout mix underneath. Polyurethane foam injection is a modern alternative that uses smaller holes and lighter material while still lifting precisely.
Re-seal expansion joints with exterior-grade sealant. When damage is extensive, full slab replacement may be the best long-term fix.
Coordinating Concrete Repairs with Seal Installation
Fix concrete first, then install seals. Give repairs time to cure fully, and clean the surface well before bonding a threshold.
Swift Garage Doors times seal and threshold work around concrete schedules, or we coordinate with your contractor so everything lines up for the best result.
Maintaining Your Water Prevention System
Once your garage is dry, simple maintenance keeps it that way. Seals age, drains collect debris, and opener settings can drift after power outages or adjustments. A quick seasonal routine helps you catch small issues before they become messy cleanup jobs.
Many tasks take minutes—sweeping the threshold, checking gutters, or wiping seals with a mild cleaner. A mid-year and pre-winter inspection by a tech can add peace of mind before rough weather arrives.
“An ounce of prevention is worth a pound of cure.” — Benjamin Franklin
Seasonal Inspection and Maintenance Schedule
- In spring after the thaw, inspect bottom and perimeter seals for cracks, stiffness, or gaps. Clean the threshold and clear the driveway edge of grit and salt. Run a light hose test to spot leaks early.
- In summer, look for UV wear on rubber and confirm drains flow during a heavy rain. Lubricate door rollers and hinges to keep the door seated evenly.
- In fall, clean gutters and downspouts, remove leaves from any channel drains, and replace weak seals before freezing weather. In winter, keep snow and ice away from the door line to prevent meltwater from pooling.
- Year-round, do a monthly daylight check, keep the floor edge swept, and watch for changes in how the door closes.
When to Schedule Professional Maintenance
Book an annual inspection even if things look fine. A technician will catch seal wear, track alignment, and opener setting issues before they cause leaks.
Swift Garage Doors offers maintenance plans that include seasonal checks, small adjustments, and priority scheduling. Call sooner if you notice recurring puddles, new light gaps, or a door that no longer closes evenly. Our 24/7 team can help during storms if a failure happens at the worst time.
Cost Analysis: Investment vs. Water Damage
Spending a little to stop water is far cheaper than paying for cleanup, repairs, and mould removal later. The right mix of a garage door bottom seal, a garage door threshold seal, and exterior drainage fits most budgets and stops repeat headaches.
Professional work often costs less over time than repeated DIY tries. Good materials, correct fit, and proper setup make a real difference during GTA storms.
Prevention Solution Cost Ranges
Bottom seal replacement runs about $30 to $80 for DIY materials and $150 to $300 for professional service. A threshold seal kit is $80 to $150 for DIY, and $200 to $400 installed.
Perimeter weather stripping usually totals $150 to $350 installed, depending on door size. Channel drains often range from $1,000 to $3,000, while French drains can be $2,000 to $6,000. Grading fixes vary from $1,500 to $5,000 based on scope.
Concrete crack sealing may be $200 to $500, slab lifting $500 to $1,500, and full slab replacement $3,000 to $8,000. A Swift Garage Doors assessment helps you pick the best path for your budget.
The True Cost of Water Damage
One storm can ruin seasonal gear, rust tools, and stain the slab. Repeated wetting harms baseboards and drywall in attached garages and can lead to mould.
Mould cleanup often runs from $1,500 to $6,000 or more, and moisture issues can lower resale value. Insurance may not cover preventable water entry, and premiums can rise after claims.
Stopping leaks with a $300 to $500 seal and threshold install can prevent thousands in damage. For commercial sites, avoiding downtime and liability is just as important as saving on repairs.
Common Mistakes to Avoid
- Picking the wrong seal profile. If the new seal does not match your retainer, it will not seat or stay in place. Using vinyl where winters are harsh can also shorten life.
- Skipping concrete prep or using weak adhesive on thresholds. Poor surface prep, off-centre placement, and the wrong glue cause early failure.
- Ignoring exterior issues. Focusing only on the door while ignoring driveway slope or gutters lets the problem come right back.
- Delaying minor repairs. Small gaps become big leaks. Never attempt spring adjustments without training, and use exterior-rated caulks and adhesives suited for cold weather.
- Piecemeal fixes when several factors are involved. Call Swift Garage Doors to build a complete plan instead of tackling one piece at a time.
Why GTA Homeowners Trust Swift Garage Doors
Local weather is tough on garage doors, seals, and concrete. Our team has served the GTA for over 10 years, and we know freeze–thaw, lake-effect snow, and heavy spring storms put every weak spot to the test.
Swift Garage Doors focuses on diagnosis first, not guesswork. We use premium weather stripping, EPDM rubber, and garage door threshold seal systems suited for Canadian winters. Our licensed technicians install with care, test with water, and stand by the work with clear warranties.
You get fast, friendly service, transparent pricing, and 24/7 emergency help during storms. From door alignment and opener settings to seal replacement and maintenance, we handle it end to end—and coordinate with trusted grading or drainage partners when the site needs more than a door fix.
Conclusion
Keeping water out starts with a clear look at the cause, then stacking the right defences in the right order. Replace a worn garage door bottom seal, add a garage door threshold seal on uneven floors, improve grading or drains when water flows toward the house, and keep everything maintained.
Many garages need a mix of steps for full protection. A professional assessment from Swift Garage Doors maps the quickest, most reliable path and backs it with expert installation and testing.
Ready to stop the leaks for good? Book a comprehensive water intrusion assessment with Swift Garage Doors. Our team is available 24/7 across the GTA for emergencies and fast service. Water damage is preventable—let’s keep your garage clean, dry, and ready for anything.
FAQs
How Long Do Garage Door Bottom Seals Typically Last in Toronto’s Climate?
Vinyl bottom seals often last about 5 to 7 years in GTA conditions, while EPDM rubber can run 10 to 15 years. Sun exposure, freeze–thaw cycles, and door usage affect lifespan. Replace sooner if you see cracks, flattening, or daylight gaps. Swift Garage Doors installs professional-grade materials built for Canadian winters.
Can I Install a Threshold Seal Myself, or Should I Hire a Professional?
Many homeowners can install a threshold with careful cleaning, accurate marking, and the right adhesive. The biggest DIY challenges are surface prep and precise placement, and mistakes cause early failure. A professional brings stronger adhesives, know-how with GTA concrete, and a warranty. Swift Garage Doors installs thresholds quickly and correctly, often saving a second attempt.
Will Replacing My Garage Door Seal Also Help With Energy Efficiency?
Yes. A tight bottom seal and fresh perimeter weather stripping reduce drafts and heat loss in attached garages. You will also notice fewer dust and pest issues and a small cut in noise. Adding a threshold improves contact and boosts comfort by reducing temperature swings.
My Driveway Slopes Toward the Garage – What Is the Best Fix?
Start with a threshold and fresh bottom seal to block immediate flow. A channel drain across the driveway is the most reliable way to intercept surface water from a negative slope. Combine both for peak protection, and consider re-grading if the slope is severe. Swift Garage Doors can assess and recommend trusted drainage contractors when needed.
How Quickly Can Swift Garage Doors Respond to Emergency Water Intrusion Situations?
We provide 24/7 emergency service throughout the GTA with same-day or next-day help in most cases. Our team can set temporary barriers, adjust door settings, and schedule permanent work as soon as weather allows. Call our emergency line or book online anytime.
What Maintenance Should I Perform to Keep My Water Prevention System Working?
Do a monthly daylight check, wipe seals with mild soap and water, and sweep debris from the threshold. Clean gutters in spring and fall, and keep any channel drains clear. Schedule an annual professional inspection with Swift Garage Doors to check seals, door alignment, and opener settings. Call sooner if you notice new gaps or recurring puddles.
Is Water Damage From Garage Flooding Covered by Home Insurance?
Coverage depends on your policy and the source of water, such as surface water, groundwater, or sewer backup. Some types require add-ons to be covered. Taking preventative steps can help with eligibility and claims outcomes. Keep records of maintenance and upgrades, and confirm details with your insurer.
